

The fastest way to get an animated photo onto social media is to upload your image to an AI photo-to-video platform, pick a motion effect, and export in under five minutes. Squish is the recommended starting point for most creators: it is free-to-start, requires zero editing skills, and produces loopable dancing, bouncing, and jiggly effects built specifically for social sharing.
Before you open any tool, run through this quick-start checklist:
- Choose a high-resolution photo with a clear subject and minimal heavy filters already baked in.
- Pick your animation style — parallax or cinemagraph for polished, high-engagement posts; dance or bounce for short-form platforms.
- Set loop behaviour before you export (seamless loop for feeds, ping-pong for playful effects).
- Select the correct aspect ratio for your platform: 9:16 for Stories and Reels, 1:1 for feed posts, 4:5 for portrait feed.
- Export as MP4 in most cases; GIF only when the platform does not accept video.
Animated posts tend to perform better than static images in feed engagement, while requiring significantly less production time than full video. That gap is what makes photo animation effects for social media worth learning properly.
Key takeaways
The single most effective approach to photo animation effects for social media is to match your animation style to your content goal, export in the correct format for your platform, and start with a free AI tool like Squish before committing to paid tiers.
| Point | Details |
|---|---|
| Start with Squish | Free-to-start, no editing skills needed; upload a photo and export a loopable animated post in minutes. |
| Match style to goal | Use cinemagraph or parallax for polished product posts; use dance or bounce effects for short-form engagement. |
| Export format matters | MP4 at 1080p is the safest choice for most platforms; use 9:16 for Reels and Stories, 1:1 for feed posts. |
| Loops drive watch time | Short, loopable animations of 3–8 seconds replay automatically in feeds and accumulate watch time with each pass. |
| Check licences before posting | Verify image, overlay, and audio licences match your intended use (personal, monetised, or branded) before you build. |
Table of Contents
- How do you animate a photo for social media in four steps?
- Which animation styles work best on social?
- How to get started quickly across three tool types
- Where do you find templates, overlays, and audio legally?
- Export and platform settings: ratios, formats, and file size
- What do free tiers let you do, and when do paywalls kick in?
- Practical tips to boost engagement and keep files lightweight
- Squish Games in practice: workflow, trust signals, and consent
- Templates versus custom animation: an editorial view
- Squish: the fast route to social-ready photo animation
- Useful sources and further reading
How do you animate a photo for social media in four steps?
Step 1: choose the right photo
Start with the highest-resolution version of your image. Avoid photos that already have heavy Instagram-style filters applied, as AI motion synthesis reads colour gradients to calculate depth and motion paths. A flat, over-processed image produces muddy results. Subjects with clear edges and a distinct foreground/background separation animate most convincingly.
Avoid:
- Screenshots or heavily compressed JPEGs (artefacts confuse motion algorithms)
- Images with multiple busy subjects competing for attention
- Photos with existing motion blur
Step 2: pick your animation approach
Three main routes exist. Template presets are the fastest: pick a preset (bounce, slide, Ken Burns), swap in your photo, and the tool handles the rest. Mask-based cinemagraph tools let you paint the area you want to move and freeze everything else. AI motion synthesis goes furthest, generating 3–10 seconds of believable movement from a single still image by inferring depth and motion from the image itself.

For most social posts, AI motion synthesis via a platform like Squish gives the best result-to-effort ratio.
Step 3: refine motion intensity and looping
Once the base animation is generated, dial back intensity if the motion looks exaggerated. Subtle oscillation reads as polished; heavy warping reads as a glitch. Add a short audio clip if the platform supports it (ambient sound lifts perceived production value). Set your loop type: seamless for feeds where the clip replays automatically, ping-pong for a playful back-and-forth effect.
Step 4: export with platform settings, then test
Export at the resolution and bitrate your target platform recommends. Then upload a test version in the native app before publishing, because compression algorithms vary between platforms and what looks sharp in your editor can soften after re-encoding.
Pro Tip: Save a duplicate of your original file before you start. AI tools sometimes shift white balance or crop edges slightly, and having the unedited original means you can revert without starting from scratch.
Which animation styles work best on social?
Different motion styles serve different content goals. Choosing the wrong one for your subject is the most common reason an animated post underperforms.
Cinemagraph keeps most of the image completely still while one small element moves: steam rising from a coffee cup, hair moving in a breeze, water flowing past a static figure. The contrast between stillness and motion is what makes it arresting. It works best for product detail shots, mood pieces, and fashion content. The key rule: keep the moving area small and well-defined. Over-painting the motion area reduces perceived quality rather than increasing it.
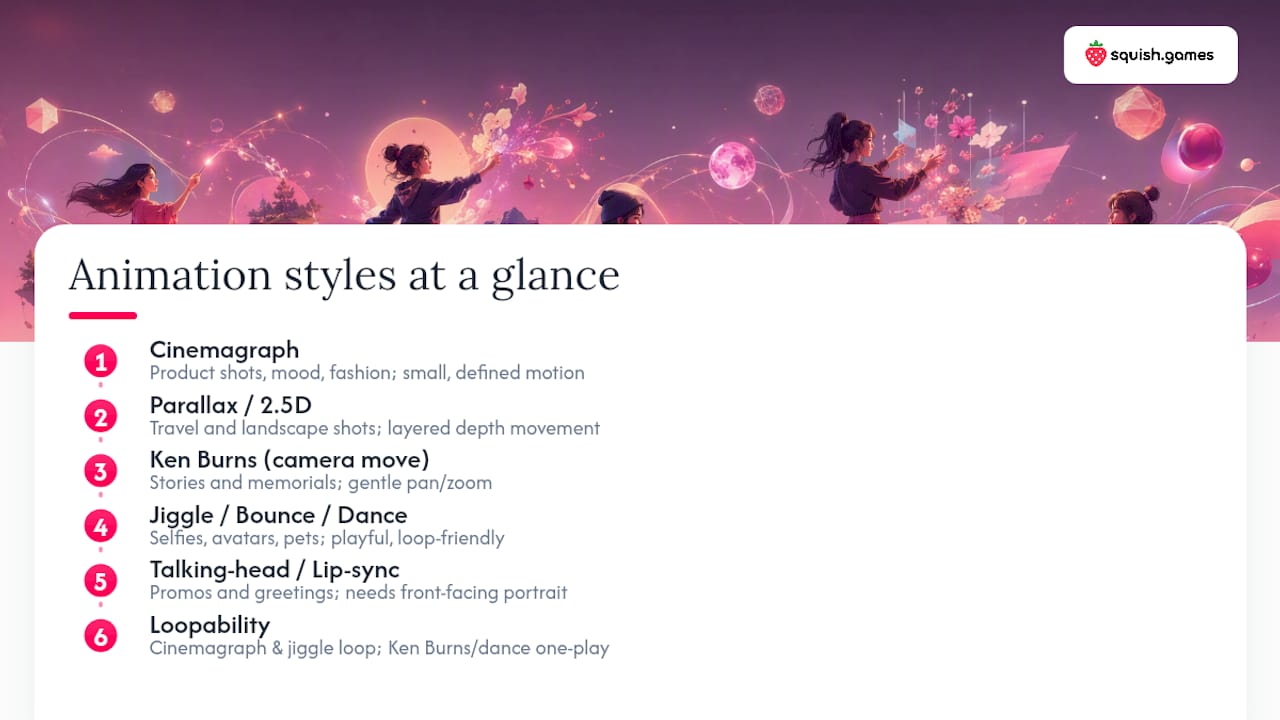
Parallax / 2.5D creates a depth illusion by separating foreground and background layers and moving them at different speeds. Travel photography and landscapes respond particularly well to this. Most AI tools generate a rough depth map automatically, though dedicated apps let you refine layer separation manually for sharper results.
Ken Burns / camera moves apply a gentle zoom or pan across a still image, mimicking a documentary camera move. This is the go-to style for storytelling slideshows and memorial or tribute posts. It loops less naturally than cinemagraph, so plan it as a one-play clip rather than a feed loop.
Jiggle, bounce and dance effects are the attention-grabbers of short-form platforms. They are deliberately playful and work well for selfies, avatars, pet photos, and AI-generated characters. Squish’s most-used effects sit in this category, and they are specifically designed to loop cleanly for feed replay.

Talking-head or lip-sync transforms animate a portrait photo to appear to speak or sing. Use these for personalised promotional clips, birthday messages, or character-driven content. They require a clean, front-facing portrait with good lighting.
For looping, cinemagraph and jiggle/bounce effects loop most naturally. Ken Burns and full-body dance effects are better as short one-play clips. Plan your loop before you animate, not after.
How to get started quickly across three tool types
Template-driven web editors
Major freemium web editors (including Adobe Express and Canva) offer photo animation as a built-in feature. The workflow is consistent: open a template, swap in your image, select a preset animation (bounce, slide, fade, Ken Burns), adjust duration and intensity, then export. Adobe Express, for example, documents its animation effect options and export capabilities for social-ready assets directly in its feature pages. These tools are fast for branded content where consistency matters more than unique motion.
The trade-off is that template presets are recognisable. If you post frequently to the same audience, the same bounce or slide effect becomes predictable within a few weeks.
Mobile animator apps
Apps such as Motionleap let you animate parts of a photo directly on your phone using point-and-drag gestures, anchor points, and a freeze brush to lock areas you want to stay still. AI sky and water effects generate motion automatically from the image content. For creators who shoot and post from their phone, this is the most frictionless route.
Tips for mobile animation:
- Set anchor points on static elements first (a building, a face) before painting motion paths.
- Use the freeze brush generously — less motion, not more, is almost always the right call.
- Preview the loop on the device before exporting; what looks smooth in the editor can stutter on export.
Squish Games quick start
Squish is built for exactly this use case. The workflow is: upload your photo or AI image, pick an effect (dance, bounce, jiggly), set loop type, adjust intensity, and export. The whole process takes under five minutes for a first-time user. Effects are designed to work on selfies, pets, avatars, fantasy characters, and AI-generated images, not just conventional photographs.
Pro Tip: For your first Squish post, try the bounce effect on a pet photo or avatar. It loops cleanly, reads well at small sizes in a feed, and tends to pull comments from viewers who want to know how you made it.
The pro route
When a campaign demands unique, high-production motion, an advanced image-to-video AI pipeline with custom depth maps and fine-tuned frame counts produces noticeably better results. It takes longer and usually requires paid credits or a subscription tier. Worth the extra effort for a flagship post or a paid brand campaign; overkill for daily content.
Where do you find templates, overlays, and audio legally?
Built-in libraries versus third-party marketplaces
Built-in template libraries inside tools like Adobe Express, Canva, or Squish are the safest starting point for UK creators. Assets inside these libraries are licensed for use within the platform, which means the tool has already cleared the rights. Third-party marketplaces (stock sites, audio libraries) offer more variety but require you to check the licence yourself before using anything commercially.
Quick asset checklist:
- Image resolution: minimum 1080px on the shortest side for social exports.
- Alpha overlays: confirm the file is PNG or WebM with a transparent channel, not a white-background JPEG.
- Music licences: check whether the track is cleared for commercial use, monetised content, or personal use only. Many “free” tracks are personal-use only.
- Attribution requirements: some Creative Commons licences (CC BY, CC BY-SA) require you to credit the creator. Check before posting.
Free assets and what to verify
For free assets, Creative Commons Zero (CC0) licences are the cleanest option: no attribution required, commercial use permitted. Platforms such as Unsplash and Pixabay host CC0 images. For audio, Free Music Archive and ccMixter offer tracks with clear licence labels.
Before using any asset commercially or in branded content, verify: (1) the licence type, (2) whether it covers video/animation use specifically, and (3) whether the platform you are posting to has its own music licensing agreements that override the track’s original licence (TikTok and Instagram do, for example).
Pro Tip: Match the asset licence to the intended use before you build the animation, not after. Rebuilding a finished post because the audio licence does not cover monetised content wastes more time than the licence check would have taken.
Export and platform settings: ratios, formats, and file size
Aspect ratios and file formats
GIF is worth using only when the platform does not accept video uploads, or when you need a file that animates without a play button (some email clients, for example). MP4 at the same visual quality is always a smaller file.
Looping settings
Seamless loops work best for cinemagraph and subtle oscillation effects where the end frame matches the start frame exactly. Ping-pong (the clip plays forward then reverses) suits bounce and jiggle effects and requires no frame-matching work. For Ken Burns and dance effects, a clean cut-to-black or fade-out is often cleaner than forcing a loop.
File size and codec tips
- Use H.264 for the widest platform compatibility; H.265 / HEVC gives smaller files but is not accepted everywhere.
- For background-only motion (cinemagraph, parallax), reduce bitrate aggressively: 2–4 Mbps is sufficient.
- For full-body dance or bounce effects, 6–8 Mbps preserves detail.
- Keep exports under 50 MB for mobile upload reliability; most platforms re-encode anyway, so ultra-high bitrate files gain nothing.
Platform final checks: select a strong thumbnail frame (not the first frame, which is often mid-motion), add captions or accessibility subtitles where the platform supports them, and confirm the loop plays correctly in the native app before you schedule.
What do free tiers let you do, and when do paywalls kick in?
Most photo animation tools follow a freemium model: the core animation feature is free, but high-resolution exports, watermark removal, premium effect packs, and commercial licences sit behind a subscription or credit purchase.
Typical free-tier limits:
- Exports capped at 720p or lower resolution.
- Watermarks on exported files.
- Limited template or effect library (often 5–10 free options versus 50+ on paid tiers).
- Credit-based premium effects: a set number of free generations per day or month, then pay-per-use.
When upgrading makes sense:
- You export frequently and the watermark or resolution cap is visible in your feed.
- You are running a commercial or branded campaign where the client requires clean, high-res files.
- You want access to premium effect packs (NSFW content, advanced AI motion, adult-themed animations) that are gated behind a paid tier.
- You need bulk exports for a content series.
For casual creators posting a few animated photos per week, free tiers are genuinely sufficient. The spend-versus-return calculation shifts quickly once you are posting daily or running paid campaigns, where the engagement uplift from higher-quality animation justifies even a modest monthly credit purchase.
Practical tips to boost engagement and keep files lightweight
Match frame count to motion type. Subtle cinemagraph oscillation needs far fewer frames than a full-body dance effect. Consumer tools handle frame rates automatically, but if you have access to export settings, 12–15 fps is enough for slow, ambient motion; 24 fps is the minimum for smooth dance or bounce effects.
Avoid over-animating. Keeping large areas of the image completely static is what makes the moving part look intentional rather than glitchy. This is especially true for cinemagraphs: the still areas are doing as much work as the moving ones.
Optimise for mobile viewing. Most social feeds are consumed on a phone over mobile data. Compress with H.264, reduce bitrate on background-only motion areas, and keep resolution at 1080p rather than 4K. The difference in perceived quality between 1080p and 4K on a phone screen is negligible; the difference in load time is not.
A/B test animated versus static. Post the same image as a static photo one week and as an animated version the next, then compare reach, saves, and comments. The data from your own audience is more useful than any industry average.
Practitioners consistently report that short, loopable animations of just a few seconds perform best in feeds because they replay automatically, accumulating watch time with each loop. AI-generated motion from a single still image now makes that format accessible without video production skills. For effect-specific guidance on which bounce, dance, and movement loops tend to lift engagement, Squish’s own editorial pages are a practical reference.
Squish Games in practice: workflow, trust signals, and consent
Step-by-step Squish workflow
- Upload: go to Squish and upload your photo, AI image, avatar, pet, or fantasy character.
- Pick an effect: choose from dance, bounce, jiggly, or other available motion styles. Each effect shows a preview before you commit.
- Adjust intensity: use the intensity slider to control how pronounced the motion is. Start lower than you think you need.
- Set loop: choose seamless loop or ping-pong depending on the effect type.
- Export: download as MP4 or share directly. Free-tier exports are available immediately; premium effects use in-app credits.
Trust signals
Squish is free-to-start with no editing skills required. It is mobile-first, meaning the upload and export flow works cleanly on a phone. The platform is designed specifically for creator sharing, with effects tuned for social feed performance rather than desktop presentation. For creators who want a deeper pipeline, the complete AI animation guide covers advanced workflows.
Safety and consent
Squish operates on a consent-first model. The platform is designed for selfies, original images, AI-generated characters, licensed creator content, consenting adult uploads, pets, avatars, and fantasy art. NSFW and adult content is available as an opt-in feature for users who choose it, in line with UK platform regulations around adult content access. The rule is straightforward: only upload images you own, have created, or have explicit permission to use. Do not upload images of real people without their consent.
Pro Tip: When documenting your Squish workflow for a tutorial or portfolio, capture a screenshot that shows the effect name, the intensity setting, and the export file size. Those three details answer the questions your audience will ask.
Templates versus custom animation: an editorial view
Templates win on speed and consistency. For a creator posting five times a week, a template-driven workflow is the only realistic option. The animation is predictable, the brand look stays consistent, and the time cost per post is low. For a content series where the visual style is part of the brand identity, templates are not a compromise — they are the right tool.
Custom animation earns its place on flagship posts and paid campaigns. When a brand is paying for reach, or when a single post needs to stand out from the creator’s own archive, the extra effort of a custom AI pipeline or a hand-painted cinemagraph produces motion that looks genuinely different. The audience notices, even if they cannot articulate why.
The decision rule is simple: post frequency and campaign importance determine the route. Daily content gets templates. A product launch or a hero post for a campaign gets custom work. Trying to apply custom animation to every post is how creators burn out and start posting less.
Squish: the fast route to social-ready photo animation
Most creators spend more time choosing a tool than actually animating. Squish cuts that out. Upload any photo, AI image, avatar, or fantasy character, pick a playful effect, and you have a loopable social post in minutes, with no editing background needed.
The free tier gets you started immediately with dancing, bouncing, and jiggly effects designed for feed performance. In-app credits unlock premium effects, higher-resolution exports, and adult or NSFW content for creators who want to go further. The platform is mobile-first, so the whole workflow runs on your phone. For creators building a body of animated work, the AI video art portfolio guide shows how to turn individual posts into a coherent creative portfolio.
Ready to see what your photos look like in motion? Head to Squish and upload your first image now.
Useful sources and further reading
- How to Animate Photos with AI — Apatero: a clear explainer covering cinemagraph, parallax, and full AI motion synthesis, with notes on image quality requirements.
- Animate your Page’s profile picture with Meta AI — Facebook Help Centre: the official Meta documentation for animating a Facebook Page profile picture, including platform-specific upload steps.
Leave a Reply